|
|
|
|
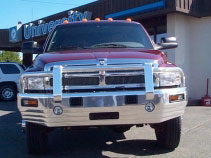
Mounting Instructions - Dodge Ram
3rd Generation Ram
2nd Generation Ram
3rd Generation instructions (please read the special note below!)
Download instructions in PDF format File size 337 KB
Special note on the new 3rd Generation Ram instructions. The first step should be to wire the turn indicator lights. Just unbolt the lights from the Ute Bullbar by removing the two nuts on the back side of the bumper. You have to remove the factory headlight units to get to the wiring, so this is best accomplished by taking this step first.
Replace the lights and let the Bullbar turn indicators hang while installing your Bullbar. Simply bolt them in place once you have the Bullbar on the truck.
2nd Generation instructions
Download instructions in PDF format File size 600 KB
NOTE: For replacement fog lights or if you are adding factory fog lights to your truck,
use Mopar part number 55076942AB.
|
 |
2bd Generation Dodge Ram BullBar™
TOOLS
- 10 mm Socket, 10 mm Spanner
- 18 mm Socket, 18 mm Spanner
- 19 mm Socket, 19 mm Spanner
- Torque Wrench
- Phillips Screwdriver
- Electric Drill
- ø6mm & ø12.5mm Drill Bits
|
|
Diagram 1
Click on thumbnail for enlarged photo
|
INSTALLATION
1. Remove existing bumper.
2. Unbolt brackets from back of BullBar™. Leave middle support crossmember in place.
3. Remove rear brackets from bracket assembly and bolt brackets to front of chassis with existing bolts. Drill ø12.5mm hole up from the bottom into the bottom flange of the chassis and bolt through using M12x35 bolts, washers and nyloc nuts supplied (refer to Diagram 1).
|
Diagrams 2 and 3
Click on thumbnails for enlarged photo |
4. Bolt front bracket with crossmember in place using M12x35 (refer to Diagrams 2 and 3). Centralize brackets relative to the body and tighten [(torque 77Nm (57 ftlb)]
|
|
Diagram 4
Click on thumbnail for enlarged photo |
IF NOT FITTING WINCH, PROCEED TO STEP 23
IF FITTING WINCH, PROCEED AS FOLLOWS
5. Remove support crossmember (refer to Diagram 2) from between front mounting brackets and discard.
6. Bolt winch box in between mounting brackets, level and flush with top of bracket (refer to Diagram 4). Use 6-M12 x 40 bolts each side with ø12 washers under bolt and under nut, and M12 nyloc nuts [(torque 77Nm (57 ftlb)]
|
Diagram 5
Click on thumbnail for enlarged photo |
7. Bolt bottom brackets of winch box to crossmember of truck. Use M12x35 bolts with ø12 washers and M12 nyloc nuts (refer to Diagram 5).
|
Diagram 6
Click on thumbnail for enlarged photo |
NOTE: For replacement fog lights or if you are adding factory fog lights to your truck, use Mopar part number 55076942AB.
8. Remove driving light from vehicle bumper by first removing and retaining adjusting screw, spring and plastic nut as shown (refer to Diagram 6).
9. Then remove driving light from plastic support bracket. Spring sides apart and push light out from the pivot.

|
Diagram 7
Click on thumbnail for enlarged photo |
10. Fit light to new light bracket supplied (refer to Diagram 7).
|
Diagram 8
Click on thumbnail for enlarged photo |
11. Mount driving light brackets with M6x20 bolts, whizlok nuts and wasters and reconnect wiring (refer to Diagram 8).
|
Diagram 9
Click on thumbnail for enlarged photo |
12. Fit winch into the winch box using the four bolts supplied with the winch, from underneath the winch box (refer to Diagram 9).
13. Mount power control box to the top right hand mounting bracket using bolts and nuts on control box (refer to Diagram 9).
|
|
Diagram 10
Click on thumbnail for enlarged photo
|
14. Connect all winch cables and wiring as per instructions supplied with the winch.
15. Cut rubber bands securing winch cable and pull the end of cable through the front hole of the winch box.
16. Lift BullBar™ into position, carefully over lights and fit 6-M12x40 bolts through mounting gussets on BullBar (refer to Diagram 10). Adjust BullBar™ level to body and tighten in position [torque 77Nm(57ftlb)].
|
|
|
Diagram 11
Click on thumbnail for enlarged photo
|
17. Pull winch cable through front of BullBar™ and fit Fairlead Rollers onto the front of winch box using 2- M12x50 bolts, spring washers, and flat washers (refer to Diagram 11)
|
|
Diagram 12
Click on thumbnail for enlarged photo
|
18. Fit winch hook to winch cable.
19. Replace the original bumper support braces bolting to side bracket of bumper using M12x35 bolts, 2 flatwashers and nyloc nut (refer to Diagram 12).
20. Adjust driving lights if necessary, using torx bit supplied with vehicle.
21. Wire in indicator and park lights to existing wiring and solder all joints.
22. IMPORTANT: Read Winch Manual thoroughly before operation.
|
|
|
|
IF NOT FITTING WINCH
23. Fit driving lights and support brackets into position (refer steps 8 to 11).
24. Lift BullBar into position and fit 6- M12x40 bolts through mounting gussets on BullBar (refer to Diagram 10). Adjust BullBar level to body, and tighten in position [torque 77Nm(57ftlb)].
25. Replace the original bumper support braces bolting to side bracket of bumper using M12x35 bolt, 2 flatwashers and nyloc nut (refer to Diagram 12).
26. Reconnect driving lights and adjust if necessary using special torx bit supplied with car.
27. Wire in indicator and park lights to existing wiring and solder all joints.
|
|
|